Configuring the DetailController View

Goal: Add the user interface to the customer detail view and specify the outlets in the DetailController.m and DetailController.h files.

  1. Double-click the DetailController.xib file to open Interface Builder.
  2. Add the user interface elements to the View. In this case, you will be adding three text fields with labels, and a button.
    1. In Interface Builder, select Tools > Library.
    2. Scroll through the Library and select the Text field icon (UITextField), then drag and drop it onto the View window. Repeat this step until you have three text fields on the View.
      You can resize the text fields using the resize handles and position the button by dragging it to the desired location.
    3. From the Library, drag and drop the Label (UILabel) onto the View window next to the text fields. Replace the text "Label" with:
      • First Name
      • Last Name
      • Phone
    4. From the Library, drag and drop the Button (UIButton) control onto the View window.
    5. Double-click inside the button and type: Submit.
  3. To make connections to the user interface from the view controller, you must specify outlets in the DetailController.h file. You must also add property declarations for the instance variables and declaration for the action method:
    1. Open the DetailController.h file and add this code:
      #import <UIKit/UIKit.h>
      #import "SUP101_Customer.h"
      
      @interface DetailController : UIViewController {
          IBOutlet UITextField *fname;
          IBOutlet UITextField *lname;
          IBOutlet UITextField *phone;
          SUP101_Customer * originalObj;
      }
      @property (nonatomic, retain) UITextField *fname;
      @property (nonatomic, retain) UITextField *lname;
      @property (nonatomic, retain) UITextField *phone;
      @property (nonatomic, retain) SUP101_Customer *originalObj;
      - (SUP101_Customer *)originalObj;
      - (void)setOriginalObj: (SUP101_Customer *)newObj;
      -(IBAction)buttonPressed:(id)sender; 
      @end
      
    2. Save the DetailController.h file.
  4. In the DetailController.m file, add the implementation code:
    1. Open the DetailController.m file and add:
      #import "DetailController.h"
      #import "SUP101_SUP101DB.h"
      #import "SUP101AppDelegate.h"
      @implementation DetailController
      @synthesize fname;
      @synthesize lname;
      @synthesize phone;
      
      - (SUP101_Customer *)originalObj
      {
          return originalObj;
      }
      - (void)setOriginalObj: (SUP101_Customer *)newObj
      {
          if (originalObj != newObj) {
              [originalObj release];
              originalObj = [newObj retain];
          }
      }
      
       // The designated initializer.  Override if you create the controller programmatically and want to perform customization that is not appropriate for viewDidLoad.
      - (id)initWithNibName:(NSString *)nibNameOrNil bundle:(NSBundle *)nibBundleOrNil {
          if (self = [super initWithNibName:nibNameOrNil bundle:nibBundleOrNil]) {
              // Custom initialization
          }
          return self;
      }
      
      - (IBAction)buttonPressed:(id)sender
      {
          
          if (([lname.text compare:originalObj.fname] != NSOrderedSame) ||
              ([fname.text compare:originalObj.lname] != NSOrderedSame) || 
              ([phone.text compare:originalObj.phone] != NSOrderedSame))
          {
              SUP101_Customer *newCustomer = [SUP101_Customer find:[originalObj id]];
              if (newCustomer) {
                  newCustomer.lname = lname.text;
                  newCustomer.fname = fname.text;
                  newCustomer.phone = phone.text;
      
                  [newCustomer save];
                  [newCustomer submitPending];
                  while ([SUP101_SUP101DB hasPendingOperations])
                  {
                      sleep(1);
                  }
      SUP101AppDelegate *delegate = [[UIApplication sharedApplication] delegate];
      [delegate.navController popViewControllerAnimated:YES];
              }
      
          }
      
      }
      
      /*
      // Implement viewDidLoad to do additional setup after loading the view, typically from a nib.
      - (void)viewDidLoad {
          [super viewDidLoad];
      }
      */
      
      
      // Override to allow orientations other than the default portrait orientation.
      - (BOOL)shouldAutorotateToInterfaceOrientation:(UIInterfaceOrientation)interfaceOrientation {
          // Return YES for supported orientations
          return (interfaceOrientation == UIInterfaceOrientationPortrait);
      }
      
      - (void)viewWillAppear:(BOOL)animated {
          
          fname.text = originalObj.fname;
          lname.text = originalObj.lname;
          phone.text = originalObj.phone;
      	[super viewWillAppear:animated];
      }
      
      
      - (void)didReceiveMemoryWarning {
      	// Releases the view if it doesn't have a superview.
          [super didReceiveMemoryWarning];
      	
      	// Release any cached data, images, etc that aren't in use.
      }
      
      - (void)viewDidUnload {
      	// Release any retained subviews of the main view.
      	// e.g. self.myOutlet = nil;
      }
      
      
      - (void)dealloc {
          [fname release];
      	[lname release];
          [phone release];
          [originalObj release];
          
          [super dealloc];
      
      - (IBAction)touchedEnded:(NSSet*)touches withEvent:(UIEvent*)event
      {
         UITextView* fname1 = (UITextView*) [[self view] viewWithTag:1];
         UITextView* lname1 = (UITextView*) [[self view] viewWithTag:2];
         UITextView* phone1 = (UITextView*) [[self view] viewWithTag:3];
        
         [fname1 resignFirstResponder];
         [lname1 resignFirstResponder];
         [phone1 resignFirstResponder];
      }
      
      @end
      
    2. Save the DetailController.m file.
  5. Change the tags in the DetailController.xib file:
    1. Double-click the DetailController.xib file to open it in Interface Builder.
    2. In the View window, select the First Name text field.
    3. Select the Tools > Attributes Inspector to open the Atrributes Inspector for the text box.
    4. In Attributes Inspector, scroll to the View section and in the Tag field, enter 1.
      iphone_textfield_attributes
    5. Repeat the same steps for the Last Name and Phone text fields respectively, and in the Tag field in the Text Field Attributes, for the Last Name text field, enter 2 and for the Phone text field, enter 3.
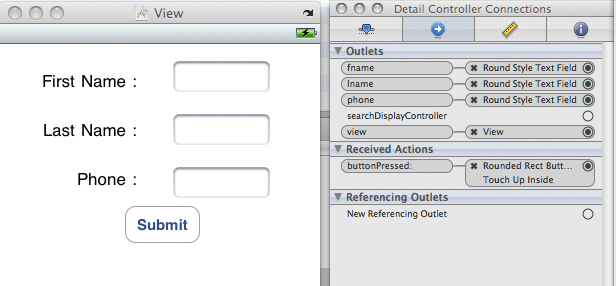
  6. Add the connections between the text fields and the outlets defined in the DetailController.m file (fname, lname, phone).
    Inside the Main Window, Control-drag a connection from File's Owner to each of the text fields and select fname, lname, and phone outlets, respectively. This will ensure outlets are linked to the text fields. The end result looks like this:

    iphone_custdetail_text_connect
  7. Add the connection for the Submit button:
    1. Control-drag a connectin from File's Owner to Submit.
    2. Select Touch up Inside for the button.
  8. Save the DetailController.xib file.