![]()
![]()
![]()
![]()
A ListView control lets you display items and icons in a variety of arrangements. You can display large or small icons in free-form lists. You can add columns, pictures, and items to the ListView, and modify column properties, using PowerScript functions such as AddColumn, AddLargePicture, SetItem, SetColumn, and so on. For information about ListView functions, see the online Help.
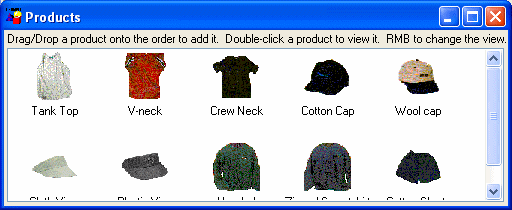
The following illustration from the Code Examples application shows a ListView control used in a sales order application.
Adding images to a ListView control is the same as adding images to a PictureListBox. The ListView control’s Properties view has two tab pages for adding pictures: Large Picture (default size 32 by 32 pixels) and Small Picture (16 by 16 pixels).
For more information, see “Adding images to a PictureListBox”.
Select the ListView control to display its properties in the Properties view and then select the Items tab.
Enter the name of the ListView item and the picture index you want to associate with it. This picture index corresponds to the images you select on the Large Picture, Small Picture, and State property pages.
On the Items tab page, you can work with rows in this way:
To |
Do this |
|---|---|
Select a row |
Click the row button on the left, or with the cursor in the edit box, press Shift+Space |
Delete a row |
Select the row and press Delete |
Move a row |
Click the row button and drag the row where you want it, or press Shift+Space to select the row and then press Ctrl+Up Arrow or Ctrl+Down Arrow to move the row |
Delete text |
Click the text and select Delete from the pop-up menu |
![]() Setting the picture index for the first item to zero
clears all the settings on the tab page.
Setting the picture index for the first item to zero
clears all the settings on the tab page.
Set properties for the item on the Large Picture, Small Picture, and/or State tab pages as you did on the Items tab page.
On these pages, you can also browse for a picture. To do so, click the browse button or press F2.
Repeat until all the items are added to the ListView.
You can display a ListView in four styles:
Large icon
Small icon
List
Report
Select the ListView control to display its properties in the Properties view and then select the General tab.
Select the type of view you want from the View drop-down list.
For more information about other properties, right-click in any tab page in the Properties view and select Help from the pop-up menu.
You can set other ListView properties.
![]() To specify other ListView properties:
To specify other ListView properties:
Select the ListView control to display its properties in the Properties view.
Choose the tab appropriate to the property you want to specify:
To specify |
Choose this tab |
|---|---|
The border style |
General |
Whether the user can delete items |
General |
The images for ListView items in Large Icon view |
Large Picture |
The images for ListView items in Small Icon, list, and report views |
Small Picture |
The state images for ListView items |
State |
The names and associated picture index for ListView items |
Items |
The font size, family, and color for ListView items |
Font |
The size and position of the ListView |
Other |
The icon for the mouse pointer in the ListView |
Other |
The icon for a drag item, and whether the drag-and-drop must be performed programmatically |
Other |
For more information on the ListView control, see Application Techniques. For information about its properties, see Objects and Controls.
