If the supported version of the BlackBerry Java Plug-in for Eclipse is unavailable for the version of Sybase Unwired Platform you are using, this is an alternative way to develop BlackBerry applications using the BlackBerry Java Plug-in for Eclipse.
Prerequisites
Generate the code for the Device Application Designer. See Sybase Unwired Platform 1.5.5 > Sybase Unwired WorkSpace - Device Application Development Documentation > Prototyping a Device Application Using the Designer > Prototyping a Device Application Using the Device Application Designer > Generating Device Application Code > Generating Code for a BlackBerry Device Application. In the Device Application Designer code generation wizard, in the Locations options, select Generate code only. Task
- Download the BlackBerry Java Plug-in for Eclipse (full installer) from http://us.blackberry.com/developers/javaappdev/. Follow the installation instructions provided with the download and install it in its own location (not in the Sybase Unwired Platform Eclipse directory).
- Open the standalone BlackBerry Java Plug-in for Eclipse.
- To use the generated code from the Device Application Designer, you must create two new BlackBerry projects—a client project and an option project. Create the client project:
- Select File > New > BlackBerry Project.
- In the New BlackBerry Project wizard, enter a project name, for example, DeptDemoClient, and click Next.
- In Java Settings, click Next.
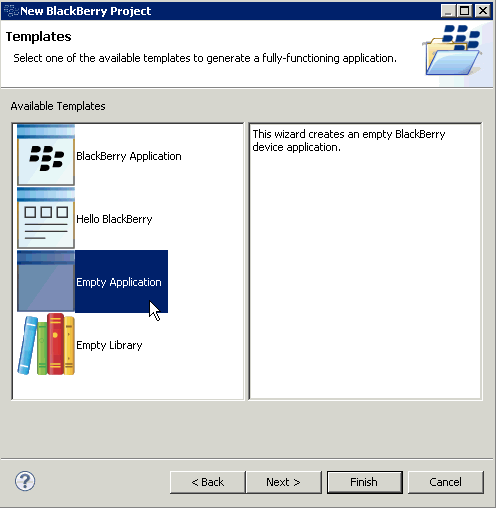
- On the Templates page, select Empty Application and click Finish.
- Create the option project:
- Select File > New > BlackBerry Project.
- In the New BlackBerry Project wizard, enter a project name, for example, DeptDemoOption, and click Next.
- In Java Settings, click Next.
- On the Templates page, select Empty Library and click Finish.
- Delete all of the automatically created files in the src and res folders for each project.
- Open the BlackBerry_App_Descriptor.xml file for each project and delete the application icons.
- Add build paths for the projects:
- Right-click the DeptDemoClient project and select Build Path > Configure Build Path.
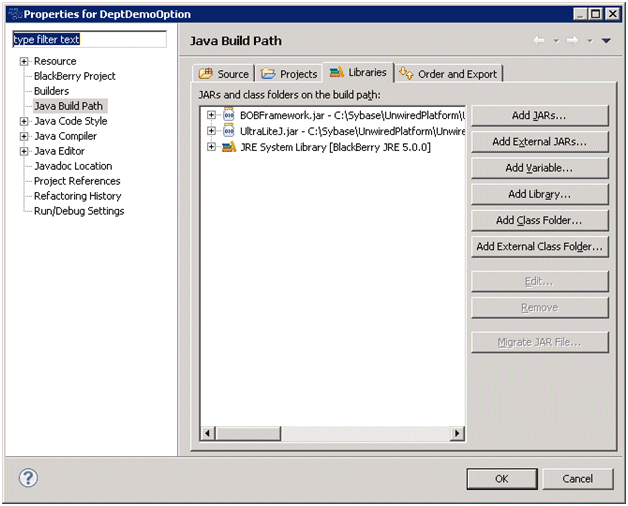
- On the Properties page, select Java Build Path in the left pane, and click Add External Jars.
- Navigate to <UnwiredPlatform_InstallDir>\UnwiredPlatform\Unwired_WorkSpace\Eclipse\sybase_workspace\mobile\eclipse\plugins\com.sybase.uep.bob.rim_<version>\generate\blackberry\build-<BlackBerry_OS_version> and double-click BOBFramework.jar to add it to the build path.
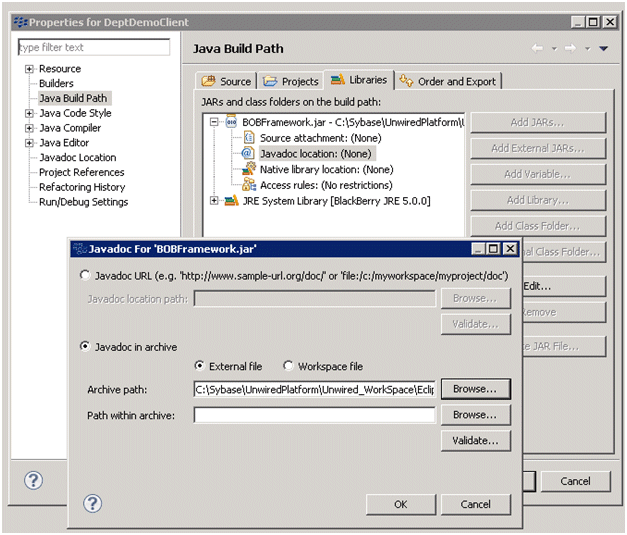
- Expand the BOBFramework.jar file and select Javadoc location, then click Edit .
- Set the location to <UnwiredPlatform_InstallDir>\UnwiredPlatform\Unwired_WorkSpace\Eclipse\sybase_workspace\mobile\eclipse\plugins\com.sybase.uep.bob.rim_<version>\generate\blackberry\BOBFrameworkJavadoc.zip and click OK.
- Repeat these steps to add the BOBFramework.jar file to the build path for the DeptDemoOption project.
- Add the UltraLiteJ.jar file to the build path for DeptDemoOption by navigating to <UnwiredPlatform_InstallDir>\UnwiredPlatform\Unwired_WorkSpace\Eclipse\sybase_workspace\mobile\eclipse\plugins\com.sybase.uep.bob.rim_<version>\generate\blackberry.
- Copy the generated files from the Device Application Designer to the DeptDemoClient project.By default, the generated files are in the DAD Generated Code\<application_name>.bob\Blackberry folder in the Mobile Application project that contains the Device Application Designer file.
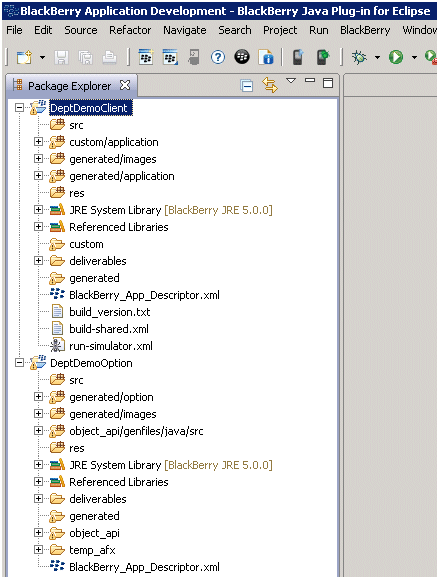
- From DAD Generated Code\<application_name>.bob\Blackberry\generated, copy the application folder to the DeptDemoClient project's <root path>\generated (not the src folder). These files contain the generated UI classes, custom screen and action classes, the image resources used by custom screens and actions, the extra source for custom screens and actions, and the BOBUIController.java file.
- From DAD Generated Code\<application_name>.bob\Blackberry\generated, copy the images folder to the DeptDemoClient project's <root path>\generated. These files contain the images used on the application UI.
- If the application uses SubClasses or WidgetEvents, there is a custom folder under DAD Generated Code\<application_name>\Blackberry. Copy it to DeptDemoClient project's root path.
- Copy the build_version.txt, build-shared.xml, and run-simulator.xml files to the DeptDemoClient root path.
- From DAD Generated Code\<application_name>.bob\Blackberry\generated, copy the application folder to the DeptDemoClient project's <root path>\generated (not the src folder).
- Copy the generated files from the Device Application Designer to the DeptDemoOption project.
- From DAD Generated Code\<application_name>.bob\Blackberry\generated, copy the option folder to the DeptDemoOption project's <root path>\generated.These files contain the generated classes of setting screens, styles, and the OptionsMain.java file.
- From DAD Generated Code\<application_name>.bob\Blackberry\generated, copy the images folder to the DeptDemoOption project's <root path>\generated. These files contains the images used on the application UI.
- From DAD Generated Code\<application_name>.bob\Blackberry, copy the object_api folder to the DeptDemoOption project's root path.
- From DAD Generated Code\<application_name>.bob\Blackberry, copy the temp_afx folder to the DeptDemoOption project's root path.
- From DAD Generated Code\<application_name>.bob\Blackberry\generated, copy the option folder to the DeptDemoOption project's <root path>\generated.
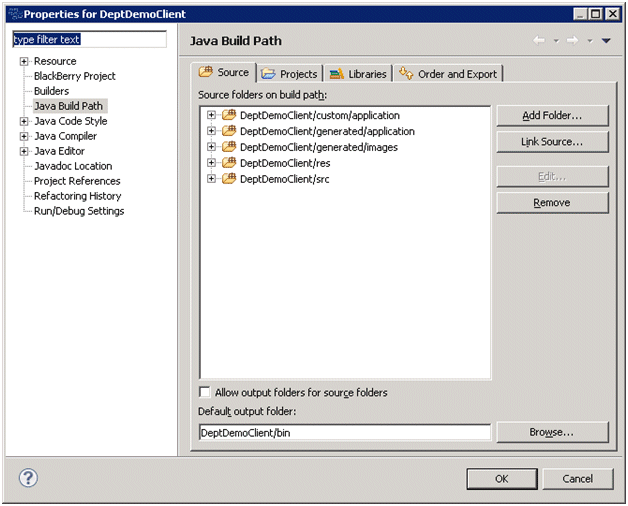
- Add the files to the DeptDemoClient project source.
- Right-click the client project and select Build Path > Configure Build Path.
- Click the Source tab and click Add Folder.
- Select the generated\application, generated\images, and custom\application folders (if applicable) and click OK.
- Click the Projects tab and click Add.
- Select the DeptDemoOption project and click OK.
- Click OK.
- Add the files to the DeptDemoOption project source.
- Right-click the option project and select Build Path > Configure Build Path.
- Click the Source tab and click Add Folder.
- Select the generated\option, generated\images, and object_api\genfiles\java\src folders and click OK.
- Click OK.
- Open the BlackBerry_App_Descriptor.xml file for DeptDemoClient, and set the values for title, version, vendor, and description. Add an application icon by selecting the ribbon image from generated\images.
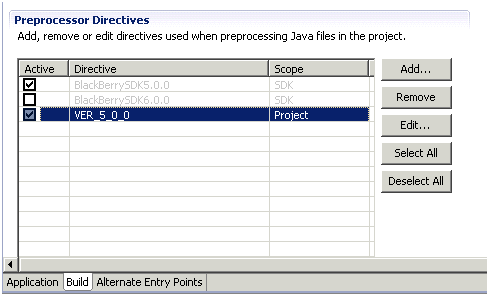
- Go to the Build page of BlackBerry_App_Descriptor.xml for DeptDemoClient. For example, if the project is for BlackBerry OS 5.0.0, add VER_5_0_0 to Preprocessor Directives, and set it to active.
- Open the BlackBerry_App_Descriptor.xml file for the DeptDemoOption project and set the values for version, vendor, and description. Select Auto-run on startup.
- Set up the simulator environment:
- From <UnwiredPlatform_InstallDir>\UnwiredPlatform\Unwired_WorkSpace\Eclipse\sybase_workspace\mobile\eclipse\plugins\com.sybase.uep.bob.rim_<version>\generate\blackberry, copy the UltraLiteJ.cod and UltraLiteJ.alx files to the plugins\net.rim.ejde.componentpack<BlackBerry_OS_version>\components\simulator directory of the standalone BlackBerry Java Plug-in for Eclipse.
- From <UnwiredPlatform_InstallDir>\UnwiredPlatform\Unwired_WorkSpace\Eclipse\sybase_workspace\mobile\eclipse\plugins\com.sybase.uep.bob.rim_<version>\generate\blackberry\build-<BlackBerry_OS_version>, copy SUPPushListener.cod, SUPPushListener.alx, BOBFramework.cod, BOBFramework.alx, BOBFramework.debug, and BOBFramework-n.debug files to the plugins\net.rim.ejde.componentpack<BlackBerry_OS_version>\components\simulator directory of the standalone BlackBerry Java Plug-in for Eclipse.
- (Optional) If custom coding uses any third party jar files, copy all those related files to the Simulator location as well (.jar files, .cod files, and so on).
- Right-click DeptDemoClient and select Run As > BlackBerry Simulator.
