A job that executes a single project consists of at least:
A Start component
A Project component
A Finish component
Figure 3-2: Job with the minimum components

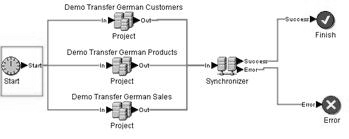
You can extend a job to include multiple:
Projects in sequential or parallel order
Synchronizers
Finish and error components
A Start component is always followed by one or more Project components.
Figure 3-3: Job with multiple components

In the Navigator, right-click Jobs and select New | Job. Available job components appear in the Component Store.
Add the Start component from the Component Store to the Design window.
Add the Project component and connect it to the Start component.
Add the Finish component and connect it to the Project component.
Double-click the Project component.
Select the project you want to include in this job. Click Save.
The job is now ready to be executed in Sybase ETL Development or as a scheduled task.
From the Navigator, you can display and access the projects included in a job.
In the Navigator, double-click the job name, or right-click the job, and select Open.
Modify the job and save the changes.
Double-click the job to copy to open it in the Design window.
In the Navigator, right-click the job and select Save As. Alternatively, select Save As from the File menu.
If you are working with multiple repositories, select the target repository.
Provide a name for the job. A copy of an existing job is created, leaving the original untouched and storing no reference to the originating job.
![]() Copying a job to a different repository does not copy
the projects included in the job. You must select projects from
the new repository for all project and multi-project components
in your job.
Copying a job to a different repository does not copy
the projects included in the job. You must select projects from
the new repository for all project and multi-project components
in your job.
If you are using multiple repositories, you can copy the complete job and projects included, from one repository to another, maintaining references to the originating objects. For example, you may want to move a job from a development repository to a test or production repository. By storing the references to its origins, the transfer recognizes the job the next time it is initiated and selectively replaces everything related to the incoming object.
In the Navigator, right-click the job to transfer and select Transfer. Alternatively, select Transfer from the File menu.
Select the repository to where you are transferring the job.
The job and all included projects are copied from one repository to another, but the originating objects are referenced.
![]() Transfer copies only job definitions. Related data,
such as, parameter sets or execution properties are not transferred.
Transfer copies only job definitions. Related data,
such as, parameter sets or execution properties are not transferred.
In the Navigator, right-click the job and select Delete.
Click Delete. By default, only the selected job is deleted. To delete the job and all included projects, select the Delete Included Projects option.
![]() Before you delete the projects used in a job, make sure
the projects are not used in other jobs. This is not checked automatically.
Projects that are currently open for design and locked by any user are
not affected.
Before you delete the projects used in a job, make sure
the projects are not used in other jobs. This is not checked automatically.
Projects that are currently open for design and locked by any user are
not affected.
In the Navigator, right-click the job.
Select Rename.