![]()
![]()
![]()
![]()
The following procedure creates and configures a new Visual Studio application. You can choose whether to use Visual Basic or C# as your programming language.
This tutorial assumes that if you are designing a C# application, your files are in the directory C:\tutorial\uldotnet\CSApp and that if you are designing a Visual Basic application, your files are in the directory C:\tutorial\uldotnet\VBApp. If you choose to use a directory with a different name, use that directory throughout the tutorial.
To create a Visual Studio project
Create a Visual Studio project.
In the right pane, select a Smart Device Project and name your project VBApp or CSApp, depending on whether you are using Visual Basic or C# for the programming language.
Add references to your project.
If this reference does not appear in the list, click Browse and locate it in the UltraLite\UltraLite.NET\ce\Assembly\v2\ subdirectory of your SQL Anywhere installation. Select iAnywhere.Data.UltraLite.dll and click OK.
If this reference does not appear in the list, click Browse and locate it in the UltraLite\UltraLite.NET\ce\xx subdirectory of your SQL Anywhere installation, where xx is a two-letter abbreviation for the desired language (for example, use en for English). Select iAnywhere.Data.UltraLite.resources.dll and click Open.
In this step, ensure that you add a link to the component, and that you do not open the component.
Create a form for your application.
If the Visual Studio toolbox panel is not currently displayed, from the main menu choose View » Toolbox. Add the following visual components to the form by selecting the object from the toolbox and dragging it onto the form in the desired location.
| Type | Design - Name | Appearance - Text |
|---|---|---|
| Button | btnInsert | Insert |
| Button | btnUpdate | Update |
| Button | btnDelete | Delete |
| TextBox | txtName | (no text) |
| ListBox | lbNames | (no text) |
| Label | laName | Name |
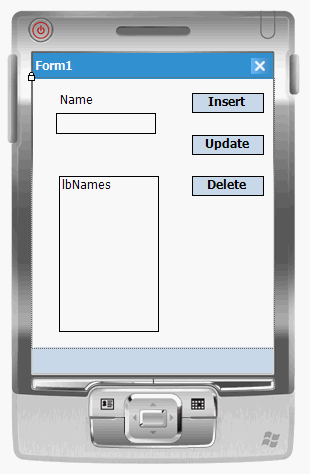
Your form should look like the following figure:
Build and deploy your solution.
Building and deploying the solution confirms that you have configured your Visual Studio project properly.
Referenced assembly 'iAnywhere.Data.UltraLite.resources' is a localized satellite assembly
This action deploys your application to the device or emulator, and starts it. The application is deployed to the emulator or device location: \Program Files\VBApp or \Program Files\CSApp depending on your project name.
The deployment may take some time.
| Send feedback about this page via email or DocCommentXchange | Copyright © 2008, iAnywhere Solutions, Inc. - SQL Anywhere 11.0.0 |