![]()
![]()
![]()
![]()
This section describes the simple case of running a single database on Windows Mobile.
To start a database on the server
On your Windows Mobile device, tap Start » Programs » File Explorer.
Navigate to the SQL Anywhere installation directory by tapping Program Files » SQLAny11.
Tap the Server icon.
The Server Startup Options window appears.
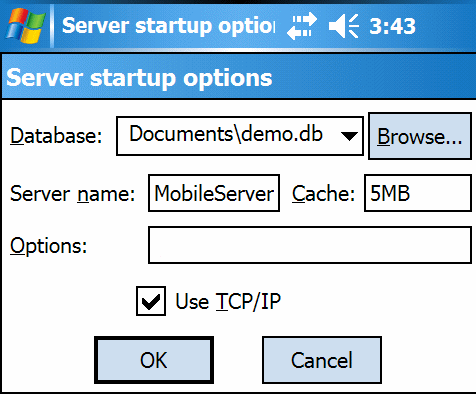
In the Database field, type the name of the database file that you want to start or tap Browse and locate the Alpha.db file in the My Documents directory.
In the Server Name field, type MobileServer.
In the Cache field, type 600 KB.
For the purposes of this tutorial, the default cache size is sufficient. However, a larger cache size can help improve performance for larger databases. See Use the cache to improve performance.
Select Use TCP/IP.
A TCP/IP connection is necessary to connect from a computer to the database running on your Windows Mobile device. You will connect from your computer in a later lesson.
In the Options field, type -gd all.
The -gd option sets the permissions to allow any user to start additional databases on the network database server. This is necessary in a later lesson. See -gd server option.
Tap OK to start the Alpha database running on the network database server.
Navigate to the Today screen on your device.
Tap the Database Server icon located in the bottom right corner of the screen.
The database server messages window appears.
When the message Now accepting requests appears in the database server messages window, you are ready to proceed to the next lesson.
Next, you will learn how to start multiple databases on the network database server on Windows Mobile.
| Send feedback about this page via email or DocCommentXchange | Copyright © 2008, iAnywhere Solutions, Inc. - SQL Anywhere 11.0.0 |