![]()
![]()
![]()
![]()
You may need to add a proxy server connection manually, either when Autodetect is unsuccessful or when some of the servers that you access with M-Business Connect should use proxy settings, while others should not. See Configuring proxy server settings.
Choose Start » All Programs » M-Business Client » M-Business Connect.
The M-Business Connect screen appears.
Click or tap the Connection tab.
On the connection tab, you can select Default (no proxies) or Microsoft Internet Explorer (to use the same proxy settings as internet explorer).
To set or change Proxy settings manually, click or tap the Change button.
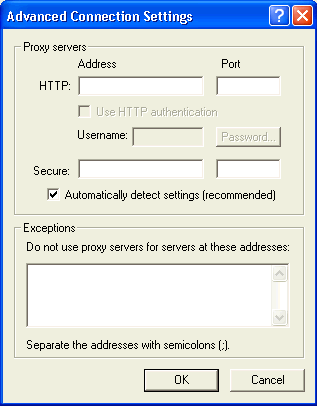
The Advanced Connection Settings dialog appears.
Enter the necessary information in the Advanced Connection Settings dialog.
Your system administrator has all the necessary information.
If your proxy server uses the HTTP protocol, enter information in the HTTP Address and Port fields.
To enter a user name and password for the server you entered in the Address field, select Use HTTP authentication and enter a user name in the Username box. Click or tap the Password button, enter a password, then click or tap OK.
If your proxy server uses a secure protocol, enter information in the Secure Address and Port fields.
Enter exceptions to the HTTP settings in the Exceptions field. Separate multiple addresses with semicolons.
Click or tap OK to close the Advanced Connection Settings dialog.
| Send feedback about this page using email. | Copyright © 2008, iAnywhere Solutions, Inc. |