![]()
![]()
![]()
![]()
Follow the instructions listed below to manually configure a new server connection using M-Business Connect.
You also can configure your server connection in personal mode on in the M-Business Server Administrator Console. See Configuring your server connection.
On your desktop, choose Start » Programs » M-Business Client » M-Business Connect or Start » Settings » Control Panel » M-Business Connect.
The M-Business Connect dialog displays.
On the Servers tab, click the Add button.
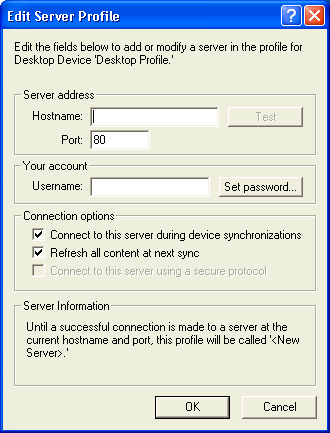
The Edit Server Profile dialog displays.
Enter the fully qualified host name of your server.
A host name is fully qualified if it includes the full path to the host server, for example, enterprise.example.com.
This is not a URL, so do not include a protocol prefix such as http://.
Enter the port number.
The default value of 80 is usually correct. If do not know your server’s port number, check with your system administrator.
Click the Test button.
M-Business Connect tries to establish a connection with the server. If the test is not successful, contact your system administrator.
In the Edit Server Profile dialog, enter your user name.
Click the Set Password button, enter your password, then click OK.
Select the connection options that you want to use.
Click OK.
| Send feedback about this page using email. | Copyright © 2008, iAnywhere Solutions, Inc. |