You can use either a Transaction object or an AdoTransaction object to connect to a database. An AdoTransaction object lets you share a connection with other database constructs in an application. For this simple application, you will use a Transaction object, which is used exclusively for DataWindow .NET controls.
![]() Drag-and-drop not available for AdoTransaction
You can add a Transaction object to a form using drag-and-drop,
but an AdoTransaction object can only be added in code. For more
information, see “Using an AdoTransaction object”.
Drag-and-drop not available for AdoTransaction
You can add a Transaction object to a form using drag-and-drop,
but an AdoTransaction object can only be added in code. For more
information, see “Using an AdoTransaction object”.
![]() To add a Transaction object to a form:
To add a Transaction object to a form:
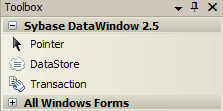
Select View>Component Designer to view the Transaction item on the Sybase DataWindow 2.5 tab of the Toolbox.

Drag the Transaction item from the Toolbox to the Component Designer.
Right-click the Transaction object to display its Properties window.
Change the Name property to myTrans.
Type the following in the DbParameter field:
ConnectString='DSN=EAS Demo DB V110 DWD;UID=dba;
PWD=sql',ConnectOption='SQL_DRIVER_CONNECT,
SQL_DRIVER_NOPROMPT'
By default, if an ODBC database connection receives an error in a client-server application, a message box prompts the user for information. In an ASP.NET application, the message box cannot be displayed and the Web application appears to hang. Setting SQL_DRIVER_NOPROMPT as a value of the ConnectOption database parameter stops the server from attempting to display a message.
Make sure the EAS Demo database is running, then click the Test Connection link in the properties window.
You should see a message box indicating that the connection was successful.
![]() Troubleshooting tip
If the connection was not successful, go back to DataWindow
Designer, select SQL_DRIVER_NOPROMPT as the value
for Connect Type on the Options page of the Database Profile dialog
box, and look at the Preview page. Change the language to whatever
language you are using, change the name of the Transaction object
to myTrans, and make sure that the code in Visual Studio matches
the generated code in the Database Connection Syntax pane.
Troubleshooting tip
If the connection was not successful, go back to DataWindow
Designer, select SQL_DRIVER_NOPROMPT as the value
for Connect Type on the Options page of the Database Profile dialog
box, and look at the Preview page. Change the language to whatever
language you are using, change the name of the Transaction object
to myTrans, and make sure that the code in Visual Studio matches
the generated code in the Database Connection Syntax pane.